Back to the main page
Setting up -Gps to Excel server edition-
The process of setting up is easy. You will be up and running in just a few minutes!
- You don't need any subscriptions or registrations. Simply use your own server/website.
- Gps to Excel Server Edition is Fully functional Trailware. You can use/test the software as long as you wish.
- The only restriction of the trailware version: you can write to Excel for a maximum of 120 lines.
Please carefully follow the 3 simple steps (and sub-steps) as described below.
Step 1:
- Download the receive.zip file to your computer (this is a little php script)
- Unzip the receive.zip file. (this creates: receive.php)
- The next step, is to upload receive.php to your server (website) into a map of your choosing. (You could use a free FTP client such as Core FTP).- Let's say, you have a website called: www.abc123blabla.com (this is just a fictional name), and you decide to put the receive.php file in a
map on your site called: gps, then the location of receive.php would be: www.abc123blabla.com/gps/receive.php
- you are free to choose any directory name you like.
Step 2:
- Download Gps to Excel Server Edition to you Windows computer.
- Install and start Gps to Excel Server Edition always with Administrator Privileges .
- The receive.php file on your server creates the file: gpsdata.txt, so you need to point the Windows software to exactly this file.
- To do this, click on the Settings tab, and enter the Server Path (please see below) and click the Save button.
- Again, the sample below is just a fictional website name... (but I assume you already guessed that)
- In the Server Path field enter: http://www.abc123blabla.com/gps/gpsdata.txt
Step 3:
- Download the Android app: Gps to Server to you Android smartphone.
Important note:
you need to configure the Settings in your Smartphone to allow the installation of apps from Unknown sources, else it will block the install.
Gps to Server for Android is absolutely safe to install. It does NOT spy at it's userbase.
It only sends GPS data to the server you specify, and only if you want to!
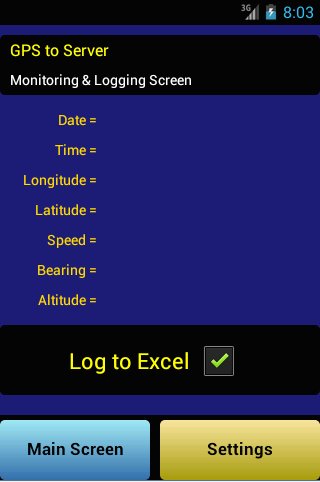
Main screen
Settings screen
- Start up the Android app: Gps to Server and tap the Settings button.
- Next, enter the your Server Path: http://www.abc123blabla.com/gps/receive.php
- Don't forget to tap the Save Settings button in the settings screen of the Android app.
That's all there is to it. Now you are ready to start logging to Excel in realtime with your Android Smartphone.
Activate Realtime logging to Excel:
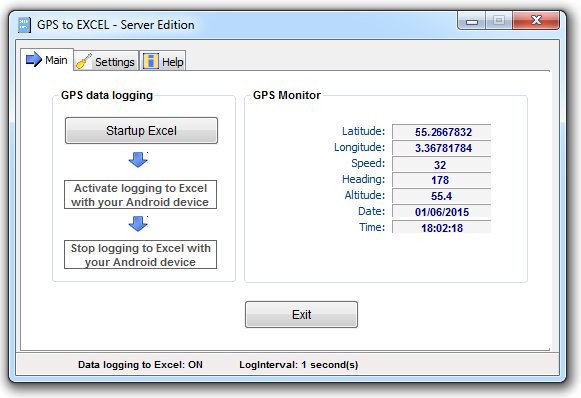
- Fire up Gps to Excel Server Edition (Windows).
- In the main screen click: Startup Excel.
- Also fire up the Android app Gps to server.
- Check the checkbox: Log to Excel.
- Please ensure that you have satellite reception.
Using your own Excel file
• Check the checkbox "Use custom Excel file" at the "Settings" tab.
• Click the button "Select Excel File" to select your file.
• Now, all data will be written to the Excel file you have selected.
• A (simple) sample Excel file is included.
Fixed position in Excel
• If you "check" this checkbox (on the Settings Tab) , then GPS data stays in row 2, and with every update overwriting the previous data, but staying in row 2 of Excel.
___________________________________________________________________________________
Important information
The Android app -Gps to Server- does NOT spy at it's userbase.
It only sends GPS data to the server you specify, and only if you want to!Known Behavior
- Sometimes the same sentence of GPS data, is logged twice in Excel.
- If you have set "loginterval" to 1 second, then it might happen (not often), that the time difference is not 1 but 2 seconds between 2 logged rows in Excel.